Where can I find it? More >>> Google Calendar.
This integration will allow you to:
- Check all new bookings and editions in real time within your TuriTop platform.
- Share the calendars of all your services with a maximum of 10 emails.
- Configure notifications and reminders for the team handling the bookings.
The synchronization described above is one-way. This means data can only be shared from TuriTop to Google Calendar, but the bidirectional synchronization from Google Calendar is not supported.
In other words, you cannot create events/reservations in Google Calendar and have them reflected in TuriTop. The reason is Google Calendar does not share many of the features that TuriTop does (such as booking anticipation, blocking schedules, resource management, prices, discounts, and many other settings). If they were to be synchronized, this would generate conflicts due to a lack of data.
Previous verifications
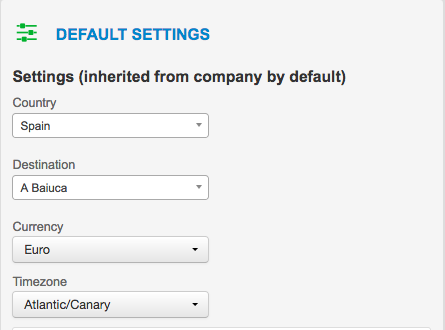
- Ensure all services created on TuriTop are set to your own time zone:
Go to Company >>> Default Settings and confirm it matches your time zone. In case you are not using by default the configuration set in Company in your Services, you will need to make these changes on each Service Default Settings.

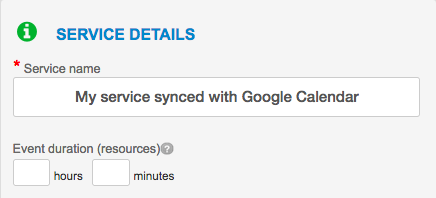
- Ensure the Event duration is properly configured for each Service:
(Only applicable for services with Standard / Tour / Activity schedules) In order for Google Calendar to display correctly each event/booking, you have to enter in Service Details >>> Event duration (resources), of every single service, their duration.

- Ensure the email has access to Google Calendar:
If you have never accessed Google Calendar with your Gmail account, the integration with TuriTop will not work. You need to have used it at least once.
Once all these requirements are checked, you can now sync Google Calendar with your TuriTop booking system.
Instructions
Step 1: Activate Google Calendar on TuriTop
You can only add a maximum of 10 Gmail accounts to sync with the Google Calendar.
First, go to Control Panel >>> More >>> Google Calendar and toggle the option Activate Google Calendar.

Then insert the Gmail account with which you want to share the calendar of your booking system.

Once added, you will see it in the box below.
Here you can see all the Emails with which you have synced the calendars.

Now you will have to select the Email address to display the services you could share with it.

Then, you will only add which service/s you want to synchronize with the calendar of said Email.

Once the service is added, simply wait for it to synchronize with Google Calendar.
It usually takes up to 7 seconds to insert a booking in Google Calendar. So, please, be patient and do not close your browser tab until this process has been completed. This waiting time is set by Google Calendar itself and not by Turitop.

Additionally, in the lowest section of the Google Calendar section, you will be able to choose how to show the title of the events in the calendar. There are 2 options:
- Customer full name and pax number.
- Service (product) name and pax number.
If the Customer name doesn't exist, the service name will be shown by default.
Step 2: Add the calendar
After granting the access, search for an email informing a calendar has been shared with you and click on Add this calendar.
Step 3: Go to Google Calendar
Now, open Google Calendar, and you will see that the service you added has been correctly synchronized with your Google Calendar.
Your bookings will appear with the following format: Time Short-id - Booking number, and the service on the left side under "Other Calendars" with the format: Short Id _ Service Number, as shown in the picture below:
If you click on any of your bookings, a window will be displayed with all the details and a link to Edit/View booking, which will take you to the Bookings tab of your TuriTop Control Panel, as shown in this image:
When you click on a booking from Google Calendar, you will be taken to the Bookings tab of your TuriTop Control Panel where all bookings appear. To see that specific one you just clicked on, you must do a manual search by its booking ID in the search field.
In addition, you have the option to see the Calendar in a daily, weekly, monthly, or 4 days view:
Preferences
In the configuration window, you can edit the service calendar within Google Calendar (e. g. its name, permissions, color, and time zone) and add different types of notifications.
You can configure this by first going to the service calendar on the left side of the screen and clicking on the 3 dots >>> Settings:
Notifications:
Here you can activate email notifications for new events, as well as event editions, cancellations, answers, and daily agenda. For more information, you can check Google Calendar documentation by clicking here.
Color:
You can also change the color of the service calendar in this same window.
The color you choose will be the background color of every booking associated with that service.
Troubleshooting
- If there are errors while giving access to an email account, verify it has already been logged in to Google Calendar before.
- If you have not received the email from Google inviting you to add the service calendar, check your Spam folder.
- Remember you must accept all the invitations and it is likely that you will receive them in the same email thread.
- If you linked a calendar before doing the Verifications and now it displays with errors, simply delete the email from More >>> Google Calendar, correct the settings, and add it again.

Comments
0 comments
Please sign in to leave a comment.